For desk workers, understanding Standing Desk Transition Without B… is essential for maintaining comfort and productivity throughout the workday. Here is what the research shows and how to apply it.
Switching to a standing desk can reduce back pain, improve circulation, and boost energy — but only if you do it right. A standing desk transition without back pain is absolutely possible when you follow a gradual, ergonomic approach. Many desk workers jump into standing all day and end up with worse discomfort than before. This guide shows you exactly how to make the switch without hurting your back.
Why Standing Desks Cause Back Pain (When Done Wrong)
Standing desks are marketed as a cure for sitting disease, but they can introduce their own set of problems. A 2018 study in Applied Ergonomics found that prolonged standing — over 2 hours without breaks — increases lower back discomfort by 34% compared to sitting. The reason is simple: standing still places continuous load on your lumbar spine, hip flexors, and knees. Without movement, your muscles fatigue and your posture collapses.
The key insight is that standing desks are not a replacement for sitting — they are a tool for variety. The healthiest workday alternates between sitting, standing, and moving. Slowvana’s philosophy aligns with this: recovery isn’t about choosing one position over another, but about building rhythm into your workday.
Step 1: Start with a 1:1 Sit-Stand Ratio
The most common mistake is standing for 4 hours on day one. Your body needs time to adapt. Research from the University of Waterloo recommends starting with a 1:1 ratio — 30 minutes sitting, then 30 minutes standing — and gradually increasing standing time by 15 minutes per week.
A safe transition schedule looks like this:
- Week 1: Stand 20-30 minutes per hour. Take a seated break after each standing block.
- Week 2: Stand 30-40 minutes per hour. Listen to your lower back and feet.
- Week 3: Stand 40-50 minutes per hour if comfortable. Never exceed 1 hour of continuous standing.
- Week 4+: Find your personal sweet spot. Most people settle at 40-60% standing time.
A timer app like Stand Up! or a smartwatch reminder can help you stick to the schedule. The goal is to build tolerance without triggering pain.
Step 2: Fix Your Standing Posture
Standing posture is different from sitting posture. When you stand, your spine naturally curves into a slight S-shape, but fatigue can pull you into a forward slump. Here’s how to maintain neutral spine alignment:
- Ears over shoulders: Tuck your chin slightly to keep your head aligned with your spine. Forward head posture adds 10-12 lbs of pressure on your neck.
- Shoulders back and down: Roll your shoulders back and let your arms hang naturally. This opens your chest and reduces upper back strain.
- Engage your core: Gently draw your belly button toward your spine. This supports your lower back and prevents swayback.
- Knees soft, not locked: Locking your knees restricts blood flow and increases joint stress. Keep a micro-bend.
- Weight evenly distributed: Shift your weight between both feet. Use a footrest or a small box to alternate one foot elevated — this reduces lumbar pressure by up to 20%.
If you struggle to maintain this posture, consider using a Slowvana monitor stand to raise your screen to eye level. When your monitor is too low, you instinctively drop your head forward, breaking the alignment chain from your neck to your lower back.
Step 3: Use an Anti-Fatigue Mat (It’s Not Optional)
Concrete floors and hard tiles are unforgiving. Standing on a hard surface for more than 30 minutes compresses the fat pads in your feet and forces your calves and lower back to overcompensate. An anti-fatigue mat reduces pressure on your spine by 25-30%, according to a study in Human Factors.
Look for a mat with these features:
- Thickness: At least 3/4 inch for adequate cushioning.
- Beveled edges: Prevents tripping and allows your chair wheels to roll over smoothly.
- Non-slip backing: Keeps the mat in place on carpet or tile.
Slowvana’s felt desk mat provides a soft, natural surface that pairs well with standing desk setups. While it’s designed for your desktop, its dense felt construction can also be used underfoot for a touch of comfort during short standing sessions.
Step 4: Optimize Your Desktop Ergonomics
Your standing desk is only as good as the equipment on top of it. When you stand, your arm and eye positions change. Here’s how to adjust:
Monitor Height
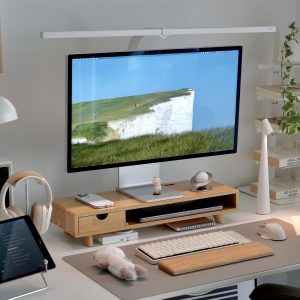
The top of your screen should be at or slightly below eye level. When standing, this usually means raising your monitor by 4-6 inches compared to sitting. A Slowvana bamboo monitor stand lifts your screen to the correct height while adding a clean, natural aesthetic to your workspace. The bamboo material also dampens vibrations, reducing eye strain from screen shake.
Keyboard and Mouse Position
Your elbows should form a 90-100 degree angle when typing. Your wrists should be straight, not bent up or down. If your desk is too high for standing, your shoulders will shrug up toward your ears — a fast track to neck and shoulder pain. Lower your keyboard tray or raise your chair height to compensate.
For wrist comfort during standing sessions, Slowvana’s gel wrist rest provides a cushioned support that keeps your wrists in neutral alignment. It’s especially helpful during long typing blocks when fatigue sets in.
Footwear Matters
Wear supportive shoes when standing. Flat shoes like Converse or ballet flats offer zero arch support, which can transfer stress up to your knees and lower back. If you prefer to stand barefoot, use a mat with good arch support.
Step 5: Move While You Stand
Standing still is almost as bad as sitting still. The human body is designed for movement, not static postures. Incorporate micro-movements into your standing blocks:
- Weight shifting: Transfer weight from one foot to the other every 5-10 minutes.
- Heel raises: Lift your heels off the ground, hold for 5 seconds, then lower. Repeat 10 times to activate calf pumps and improve circulation.
- Hip circles: Gently rotate your hips in a circle to loosen the lower back and hip flexors.
- Shoulder rolls: Roll your shoulders backward 10 times to release tension from the upper traps.
- Walking in place: March gently for 30-60 seconds every 20 minutes. This reduces venous pooling in your legs.
These micro-movements take less than 2 minutes total per hour but can reduce perceived discomfort by up to 40%, according to occupational health research.
Step 6: Listen to Your Body’s Signals
Pain is a signal, not a badge of honor. If you feel sharp pain in your lower back, hips, or knees while standing, stop and sit down. Pushing through pain can lead to chronic issues like plantar fasciitis, sciatica, or joint inflammation.
Red flags that mean you need to adjust:
- Burning sensation in your lower back after 20 minutes of standing
- Numbness or tingling in your feet or toes
- Sharp knee pain when shifting weight
- Persistent hip pain that doesn’t resolve with movement
If any of these occur, reduce your standing time, check your posture, and ensure your desk setup is correctly aligned. Consider consulting a physical therapist for a personalized assessment.
Why Slowvana Supports Your Transition
At Slowvana, we believe that recovery is the new productivity. A standing desk transition without back pain isn’t about willpower — it’s about having the right tools and knowledge. Our product line is designed to support every phase of your ergonomic journey: from monitor stands that fix your neck alignment to wrist rests that prevent strain during long typing sessions.
Slowvana’s bamboo monitor stand, for instance, is crafted from natural bamboo that complements any workspace while lifting your screen to the perfect height. It’s a small change that makes a big difference in your standing posture. Similarly, our large felt desk mat protects your desk surface and provides a calm, organized foundation for your standing setup.
Conclusion: The Gradual Path to Pain-Free Standing
A standing desk transition without back pain is achievable with patience and proper ergonomics. Start slow, fix your posture, invest in an anti-fatigue mat, and keep moving throughout the day. Remember: the goal is not to stand all day, but to create a dynamic workspace that respects your body’s need for variety.
Slowvana is here to help you build that workspace — one thoughtful product at a time. Explore our ergonomic collection to find the tools that make your standing desk work for you, not against you.
🪑 Fix Your Desk Setup in 5 Minutes
Download the free Ergonomic Setup Checklist — 15 steps to reduce pain and work comfortably.
Get Free Checklist →